Notably, using native code on Android generally does not result in a noticable performance improvement, but it always increases your app complexity. In general, you should only use the NDK if it is essential to your app—never because you simply prefer to program in C/C++Today, I am going to cover how I managed to configure my Eclipse environment to start developing with Android NDK. Before you proceed the rest of tutorial, think twice. Make sure you are doing this for code reuse and portability and not for computational performance benefits.
Prerequisite
This tutorial assumes you have installed Android SDK environment, Java JDK, and Android ADT plugin. If you haven't installed any of those things listed above, follow the tutorial posted by Android code monkey. Once you are done with that, create a new Android project in your Eclipse environment and follow the rest of the tutorial.
Android NDK Installation
Android NDK Installation
- Install Android NDK
- Unzip Android NDK (i.e. C:\Android\android-ndk-r8 or /usr/local/android/android-ndk-r8)
- Unzip Android NDK (i.e. C:\Android\android-ndk-r8 or /usr/local/android/android-ndk-r8)
Native Code Configuration (C/C++ code)
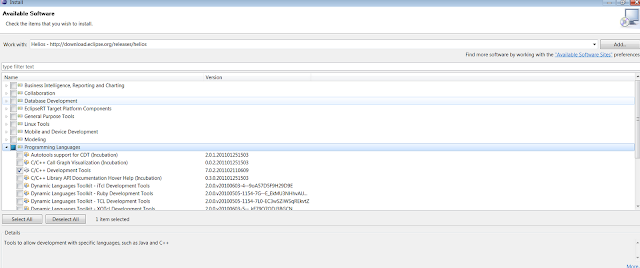
Install C/C++ Eclipse plugin
- Choose Help -> Install New Software… from the main menu.
- Choose http://download.eclipse.org/releases/galileo as the source site. If you have another Eclipse release than Galileo choose the appropriate url.
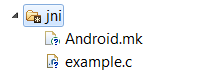
Create JNI folder in your eclipse project
- A folder named 'jni' (lowercase) must be created by you in the Eclipse project's root directory.

Create C/C++ JNI sources (example.c)
- Create your c files in jni directory you created above
- For the tutorial, I created example.c to illustrate the basics. I wrote a simple function called initEngine(int x) that doubles up the int x passed and returns the sum.

Header Information
- You must have #include and this is necessary for all the JNI configuration in your native code
Return Type
Return Type
- JNIEXPORT int JNICALL
- int - return type of your JNI call
Function Declaration
- int - return type of your JNI call
Function Declaration
- Functional declaration in between _ has meanings:
- Java: We will use Java to invoke this native code
- com_goeverywhere_jni: package representation of your Java JNI class.
- Java: We will use Java to invoke this native code
- com_goeverywhere_jni: package representation of your Java JNI class.
- JNILoader: name of the Java class
- initEngine: method name within the Java class
Function parameters
Function parameters
- (JNIEnv * env, jobject obj) - this is required for JNI invocation
- Parameters preceding above is the parameter for your function declaration
- jint x: this is added for my JNI function parameter for initEngine(int x)
Create Android.mk
Android.mk is a makefile needed to compile your native sources between Android NDK and your native code. Information writing on Android.mk file can be found in 'docs' folder inside the Android NDK folder. The most relevant document is the 'ANDROID-MK.TXT'
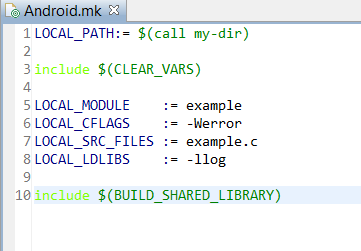
- LOCAL_PATH - path of your module. $(call my-dir) refers to same directory as the 'Android.mk' file
- LOCAL_MODULE - module name. This name should not have any spaces in it as it will be made into the actual library's name ('libexample.so' for us).
- LOCAL_CFLAGS - compiler flags.
- LOCAL_SRC_FILES - source file name
Write Java JNI library in Java
Now, let's write some Java code!


- Notice that the prefix of function declaration of native c function written above (i.e. Java_com_goeverywhere_jni_JNILoader_initEngine) must match with the Java package represenatation
- System.loadLibrary(module) must be invoked to load the native module via JNI and this must match what you defined in Android.mk:LOCAL_MODULE
- The functional declaration in java side must match with native declarations above with special keyboard native
Configure Eclipse Builder
There are multiple ways you can compile what you have implemented above. You can install cygwin and install packages associated with it to compile with GCC libraries that comes with it. However, Android NDK already ships with precompiled version of make files and other necessary bundles.
I didn't want to deal with going into Cygwin or cmd prompt everytime I compile my code. Therefore, what I ended up doing is simply configuring an Eclipse Builder that automatically builds using ndk-build.cmd from Android NDK.
Right click on your project -> Properties -> Builders

Create a new Eclipse Project builder

- Working Directory: reference to your Android project in your Eclipse
Eclipse Project builder -> Refresh tab

- libs directory is where your Android project looks for compiled resources (jars, libs) by default
- Click "specify resources" and configure location of libs directory
- Once you configure this and refresh your project, your builder will execute and compile all the source codes for you!
Eclipse Project builder -> Build options

- Click "specify resources" and configure your location of jni directory
You are done!

- Your console will show that you have successfully compiled your sources. Depending on your CPU architecture, your compiled library will be compiled into the appropriate folder in your libs (i.e. armeabi)

